


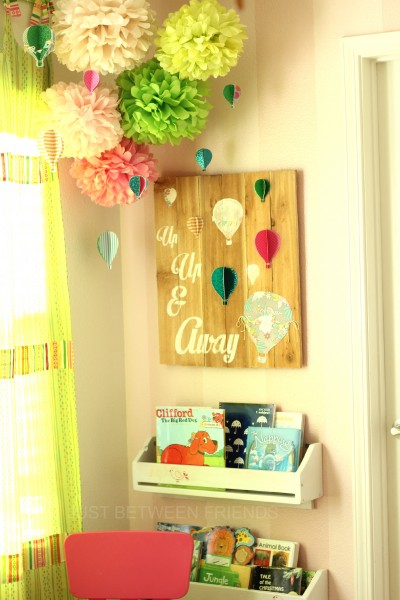
Hot Air Balloon Wall Art

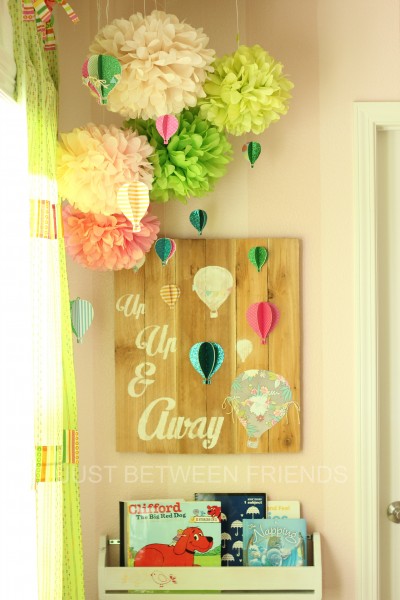
As promised, today I will be showing you how I made the cute hot air balloon wall art in my girl’s room. It is really so easy and inexpensive to make, and it doesn’t hurt that it is darling (if I do say so myself) Let’s get right to it, shall we?
Supplies needed:
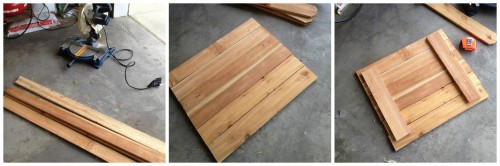
- (3) 6 foot cedar fence posts
- 1/2 inch nails and hammer
- White paint
- Scrapbook paper
- Embellishments
The first thing you will need to do is get your wood ready. I bought the 6 foot long cedar fence posts that were dog eared. I love the look of a palette wood sign, but I don’t like to use it in my house because of all the things that are on the wood from sitting outside so long. I feel like the cedar gives the same type of look without the danger of all the chemicals and other things that are on the palette wood. Y ou can buy the cedar planks for 1.69 per piece, so it is really cheap and smells amazing when you cut it.
Now to cut the wood. If you have a saw at home, use it. If you don’t, when you buy your wood at Home Depot or Lowe’s (I bought mine at Home Depot) just have them cut it for you. They don’t mind doing it, promise! I cut my pieces to be 24 inches long for the sign, and then for the pieces that hold the sign together, I cut them to be 17-18 inches long. To sum it all up, here is your cut list. You need 6 pieces cut to be 24 inches long, and 2 pieces cut to be 17-18 inches long. Here’s how to assemble it, and really it’s self explanatory. You just put the (6) 24 in pieces of wood together with the side you want on the front facing the ground. Then you put the 18 inch pieces across the top and the bottom and use your nails to attach them together.
Now the fun part! You should use the same method that I showed you yesterday and make some more hot air balloons. You won’t need as many cut out since it is only half a balloon. I wanted the sign to be 3D and this really helped make it just pop out at you.
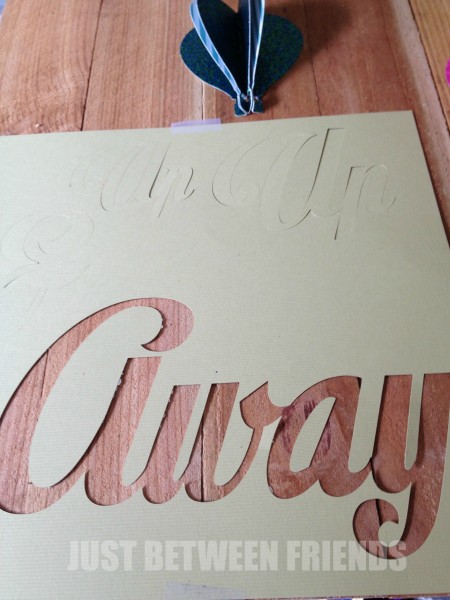
I used my silhouette to cut out the letters just on some cardstock and used it like a stencil. It worked perfectly! I also used the paper that I had cut out my hot air balloons on as a stencil and painted some balloons on with white paint. I attached all of the pieces with some hot glue and it worked like a charm for me!
Once everything is attached, you can embellish your hot air balloons if you would like to. I really loved the look of the bunting on the balloons with the bakers twine bows, so I used that.
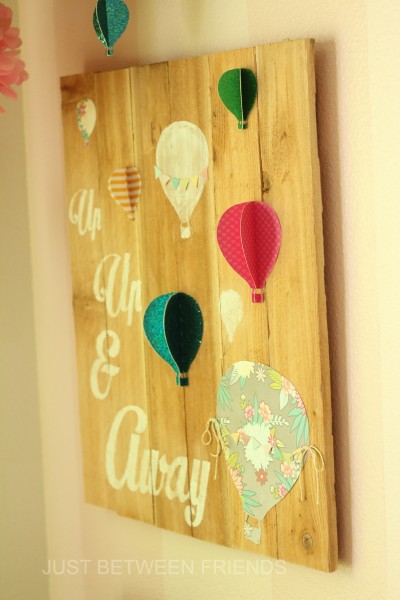
Ta-da! Your sign is done. Step back and enjoy the view!

Wow! This is so great, I love it! I have a trip to Home Depot planned this afternoon and now I’ve got a few more things to add to the list 🙂 This will be perfect for covering the awkward breaker box panel thing that’s in a horribly noticeable place 🙂