


Ruffle Flower Tutorial
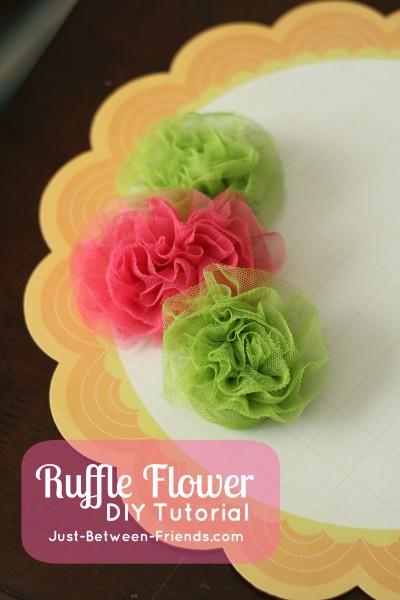
Let’s start this week off with a simple twist to a favorite bow. My poofy flower tutorial is one that a lot of people love, so I thought maybe I would make one that is even faster to put together and just as cute! Here is my Ruffle Flower Tutorial!

To create this bow, you will need to go to your local Joanne’s store, or any store that carries different types of fabric trim. I got mine at Joanne’s, so I know that it will be there. You can find it with the trim that is sold on the spool that you get cut to various lengths.
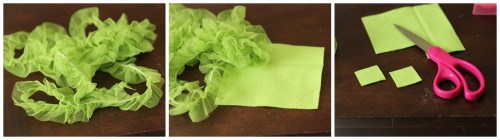
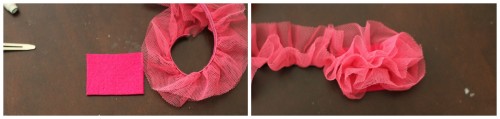
To begin, I cut a little square piece of felt to use as my base. Simply add a little dab of glue in the center as your starting point and place your trim on top.
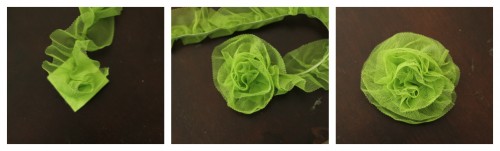
Work your way in a circle adding drops of glue as you go around the trim. Once you get the flower to the size that you would like (or the edge of the felt square) just cut the trim and glue the edge under the last row.
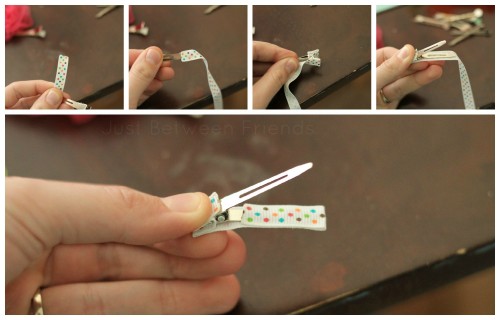
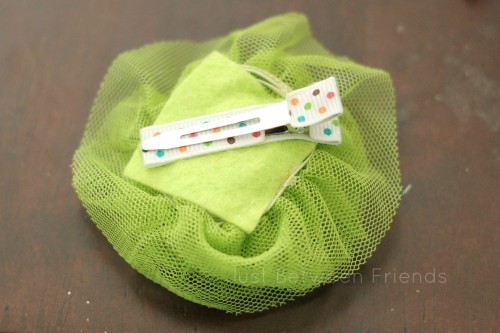
The flower part is finished, but we need a clip to be able to put it on. The best way to do it so that it sticks to the flower is to cover a metal clip with ribbon. Here’s how you do it. Start by melting the edge of the ribbon with a lighter. This seals the edge so that it won’t fray. Then you will put a dab of hot glue on the bottom of the clip towards the edge and place the ribbon on it so that the ribbon is heading away from the clip. Place two more dots of glue on the inside edge of the clip and place the ribbon there. Next, flip the clip over and dab the glue there as well so that the ribbon is now covering the entire edge of the clip. Pinch the clip open and run some glue on the top side of the clip and place the ribbon there. Allow it to cool and dry before you let the clip close. Otherwise it will be glued shut. You will need to cut your ribbon now so that it is long enough to fit inside the clip just on the upper part. Be sure to melt the edges and then glue it into place.
To connect it to the flower, just add hot glue to the ribbon side of the clip and press onto the bottom of the flower.
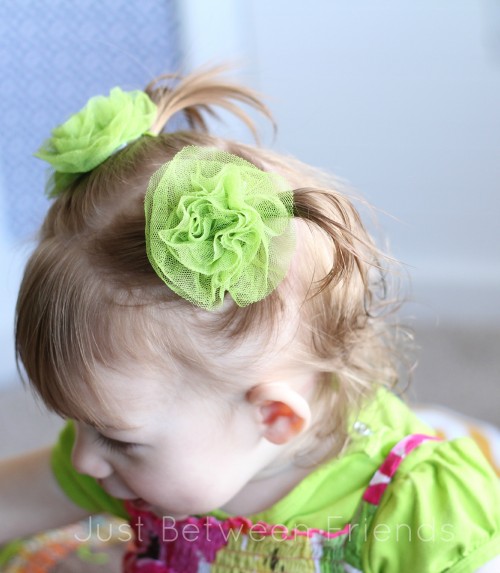
There you have it! A seriously cute and easy bow to make that adds just the right amount of cuteness. See?

I also made a pink one using a rectangle base instead of the square base and liked the way that one turned out as well. You can see it completed in the picture at the top of this post.
So, what do you think? Will you be making one of these? Be sure to check back throughout the week for even MORE fun tutorials!

This is super cute. Pinned. Done!
I’m so excited to be rooming with you for SNAP! Definitely stalking you now. Love it!
Kaylynn
AmongTheYoung.com
Adorable in the pig tails! This is a great tutorial. I can see using these in all sorts of projects.
What type of glue are you using to glue the fabric ribbon to the felt?