


Vinyl Stencils | Inverse stenciling method


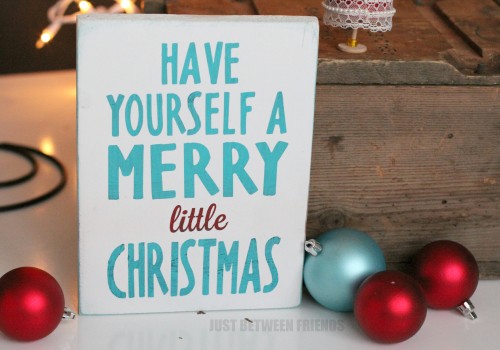
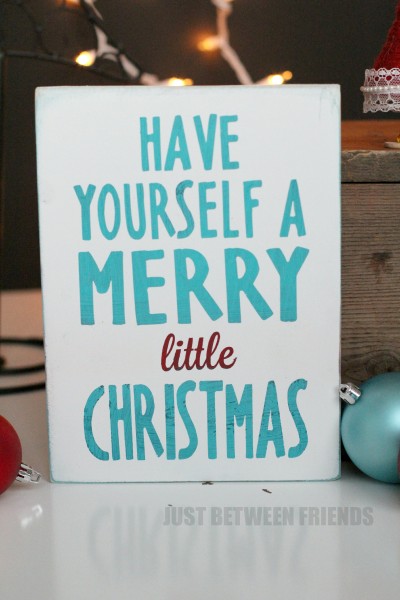
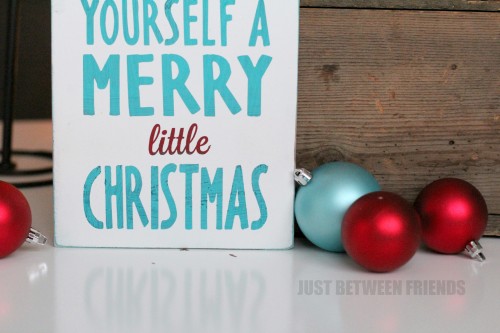
Earlier today, I showed you basic vinyl stenciling techniques. Now, I want to show you the other way that you can use vinyl stencils. I really like this method the very most, but both ways have their purposes for sure! This is another very popular sign design that I am sure you have seen on pinterest. I thought it would be a really fun and easy gift to give to friends this year.
I started by designing the vinyl using my Silhouette machine. I found fonts that were similar to the original because really, there is no reason to change it if you like the way it looks 🙂 I used more of the brown vinyl that I got from Expressions Vinyl. It is just the standard indoor vinyl. Nothin fancy. Once it was cut, this time I wanted to keep the letters on my backing paper and get rid of all the negative space.
Next, I cut my wood to size. The wood is just a 1″x 8″ piece of wood that I cut into 9.5″ pieces. After they are cut, sand them down so that there isn’t any rough spots and then you are ready for some paint.
I wanted to have some dimension to what I was doing, plus a distressed kind of look. There is definitely an easier way to do this, but if you want it to look like chippy paint with several colors in the letters, you should follow along. I started with spray paint. I painted the top part and the bottom part of the board a teal color, and then left a spot about 3/4 of the way down the board for a strip of red spray paint. Once that was dry, I took a lighter blue color and painted over the blue. Once the blue paint is dry, it’s time to add the vinyl lettering to the board. This is a little bit tricky, but not too hard. With the vinyl on the transfer tape, I cut out the “little” in the saying leaving the side intact so that my letter spacing was unaffected. I centered the vinyl to be exactly where I wanted it to be on the board and then used a scraper tool to apply the vinyl to the wood. This is now the time that you will paint your red part. It will make it so that only the “little” will get red lettering. I painted a brighter red color and once dry, I put the last of the vinyl down. I made sure it was really adhered and then removed the transfer tape.
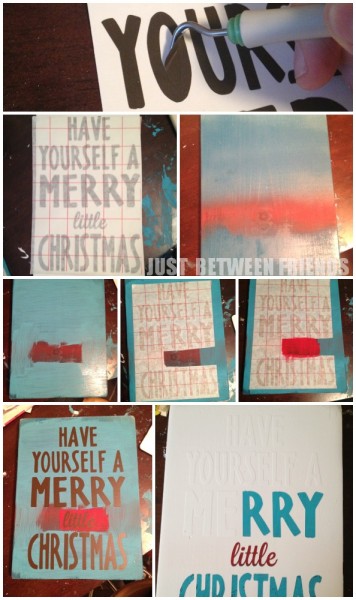
Now for the fun part. You are ready to paint the white part of the sign. Your vinyl letters should still be on your board, and then you will paint over the top of everything with your white paint. I used a white spray paint in a semi gloss so that it had a little sheen to it. Let it sit until it is dry to the touch and then carefully pull up the vinyl and you will be left with your beautiful sign! The last thing that you need to do to finish it off is to use some sandpaper to rough it up a little bit and bring out those spray painted colors you painted first. It brings a depth that is so nice!
I hope this has been helpful to you! Let me know if you have any questions, and don’t forget that there is still time to go enter to win a $25 gift card to Expressions Vinyl in our I <3 Vinyl giveaway!

Looking good.
Oh I love this!
I have never used vinyl like this. I need to try it! Looks fun.
This is so cute and I love the colors you chose. Pinned!
I love vinyl, there are so many different ways that you can use it! This turned out really cute!
I need some of that vinyl!
I need some of that too – vinyl just makes life so much easier!