


DIY Jewelry Display

I am SO excited about this post because of the way my project turned out. It’s not very often that I sit back and think, “this. is. awesome.” but today is certainly one of those days where I am patting myself on the back a little bit. Now that I’ve talked it up a bit, you probably are wondering what I am talking about. Well, a picture says a thousand words, so let me show you my DIY Jewelry Display!
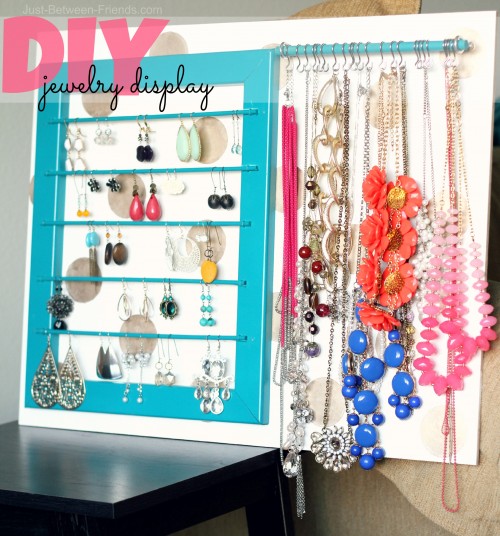
My old earring holder I made and posted on here was just not meeting all of my needs when it came to holding my jewelry, so we broke up. Ha, just kidding, I replaced it. I have a feeling that this new jewelry holder and I will be friends for a very long time. This is a little bit more of an in depth project, but anyone could do it if they wanted to. Now that you’ve had the disclaimer, let’s get right down to it.
Supplies:
- 1/4″ MDF board
- 10′ of 1X2 MDF pre-primed trim -OR- you can use a picture frame
- 3 dowels size 3/16X36″
- 1 dowel size 7/16X48″
- staple gun
- eye screws- also known as screw eyes. You will need size #8. If you buy from Home Depot, I bought the Crown Bolt brand and they can be found on the isle with all of the screws and nails.
- Hooks (I used these from IKEA)
- Paint of your choosing
Here we go! Begin by purchasing all of your supplies. Everything can be purchased at Home Depot EXCEPT for the hooks and acrylic paint. There might be another hook option at Home Depot if you would like to search for something similar, but for the price and the quantity, the hooks I bought at IKEA were definitely the best option.
You will need a piece of 1/4″ MDF that is 19″X24″. The MDF is sold in pieces that are 2 feet by 4 feet, so have them cut it for you before you leave the store. It will be one less thing to worry about and one less power tool to use if you are uncomfortable using them. This is where the tutorial can be modified just a little bit. If you have a picture frame that would work for this project, use it. I didn’t have one that had a flat front, and that was the look I wanted, so I made my own instead. If you have the picture frame, you can skip a couple of steps. If you don’t, make sure you get the 1X2 MDF pre-primed trim. It will make your life really easy since it is ready for that first coat of paint already.
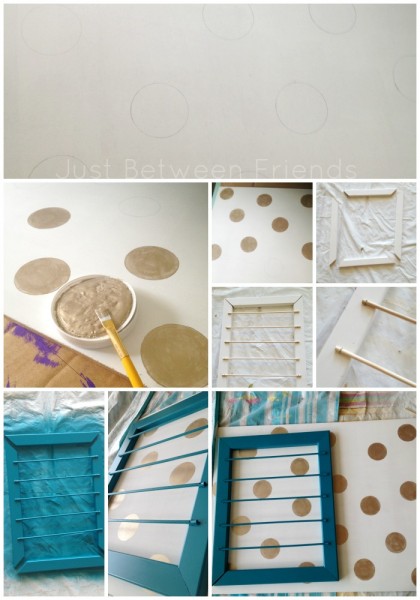
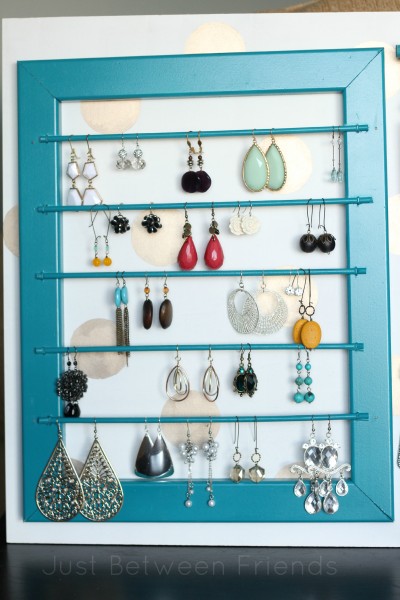
I brought all of my supplies home and got to work. I began by painting the MDF board white. I would recommend using an acrylic paint for this step. MDF sucks in spray paint and you will be painting for hours with no luck. After the white paint was dry, I traced a circle pattern onto the board and then hand painted the circles using a metallic paint from the Martha Stewart line of paint at Home Depot. You can do any pattern that you want, it is definitely personal preference.
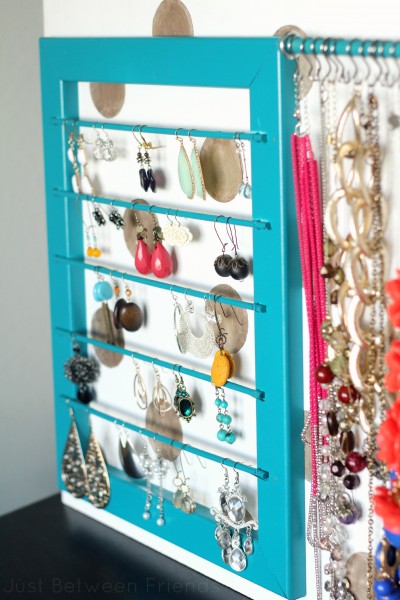
While that was drying, I cut my MDF trim to a size that would fit on the MDF board. I cut mine at 45 degree angles and fit it together like a frame, but you could also just use straight pieces and it would work just the same. I cut my smaller dowel to fit the size of the frame that I just made and then used a staple gun to hold it in place. Once the dowels were attached, I spray painted the frame and dowels to be a beautiful teal color.
After that was dry, I attached the frame to the freshly painted MDF board. You can do this a couple of ways. I used a nail gun to attach it, but you could also just use hammer and nails. You could try just using a wood glue, but I didn’t because I wasn’t sure how heavy things were going to get once the jewelry and everything was loaded on and wanted to make it nice and secure.
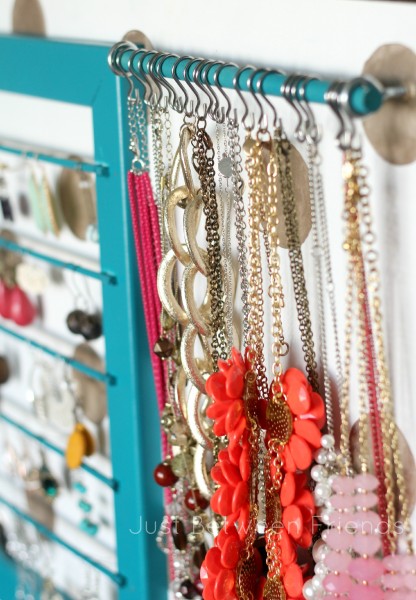
Now that the frame is attached, we can cut the large dowel to fit next to the frame. Once the dowel was cut, I spray painted it the same teal color. While that was drying, I screwed the eyelet screws into place. I didn’t want it to go all the way through since I was hanging it on the wall, but you want it to go through until it is barely poking through so that it is really stable.
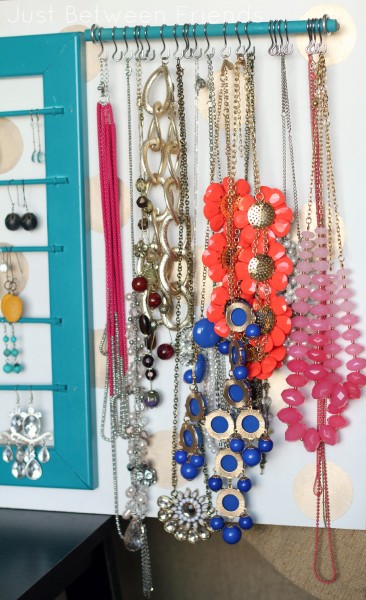
Put the hooks on the dowel next. My dowel was slightly bigger then the hooks were, so I used some needle nose pliers and pulled the hook open just slightly. I also pulled open the smaller hook that the necklaces hang from because the opening wasn’t quite big enough for the necklace to be put onto it. Now you can put the dowel into the eyelets and you are good to go!
What do you think? Is this something you would like to make and use? I know I will be getting some really great usage out of mine. Oh, and also, I should tell you I hung it up in my closet where there is really bad lighting which is why I didn’t take a photo in there. BUT to hang it up, I simply found the studs in the wall and drilled screws through my board and into the studs. It is solid as a rock now. Let me know if you have any questions about how this is constructed and I will be happy to help you!

oooh I love yours! I’ve had stuff to do an organization thing for my jewelry forever. I so need to do it!
Yay! You put the tutorial up! Now I can actually make one of my own!
This looks fantastic! I love the gold polka dots behind it!
It turned out fantastic! I absolutely love it and the polka dots!
Oh I love this! Great idea!
Looks perfect–thanks for the instructions!
That is adorable! Pinned it!
Visiting from the Utah bloggers!
Oh that turned out so great – you deserve to give yourself a pat on the back! Great job!
Hello! If you’re reading this then you’re living proof that contact form advertising works! We can send your advertisement to people via their contact us form on their website. The best part of this kind of promotion is that messages sent through feedback forms are automatically whitelisted. This dramatically improves the chances that your message will be read. No PPC costs! Pay a one time fee and reach millions of people. For details send a message to: william4212sau@gmail.com