


DIY Easter Egg Decoration

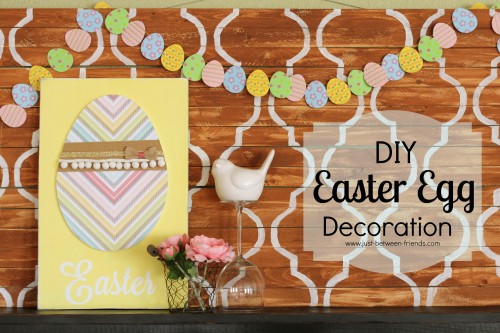
With Easter just days away, I wanted to have something cute on my mantel to celebrate with, but it couldn’t be anything that took a long time to make. It also had to be something that didn’t take a ton of money to make either. Yesterday I was feeling extra crafty and decided to just get going on a project. I am in LOVE with the way my mantel came together.
I saw a tutorial on Lolly Jane for this cute Easter art, and knew it would be a fun thing for my mantel. I used their basic idea and made it more “me” of course.
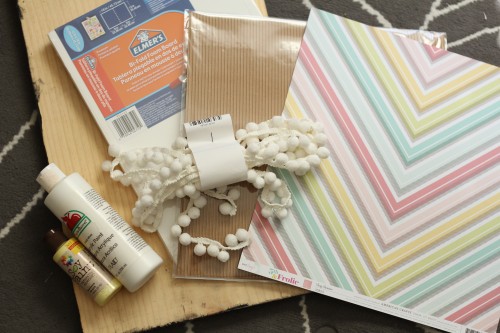
I was given a box of Dear Lizzy products from their 5th and Frolic line and really just love the colors that are used. For this project, I used the striped double sided cardstock, burlap bows, and glitter ribbon tape. (ps glitter tape. is. awesome. Just go buy some already cause it makes life SO easy!) If you happen to live close to a JoAnn’s, you can also go pick up any of the 5th and Frolic line there because it is NOW carrying the full line! Wa-hoo!
Let’s get on with it. Here’s how I made my DIY Easter Egg Decoration:
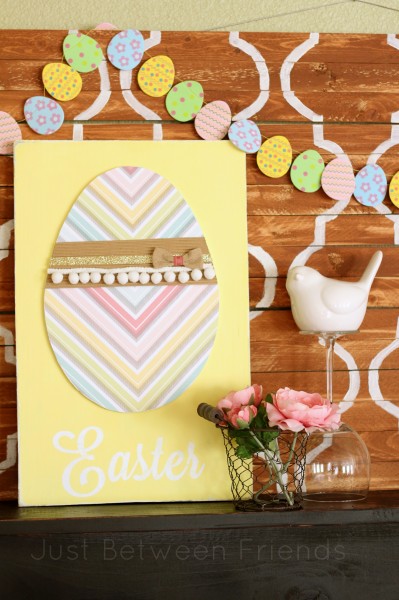
Begin by painting your board white. My board is 12 inches wide and about 2 feet long, but you can really do this with any size of board. After your first coat of paint is dry, apply the vinyl lettering. I used my silhouette machine to cut out the lettering and then transferred it to the board. Once your vinyl is applied, paint your entire board the color you want it to be. (I chose yellow.) Last, remove the vinyl and you will be left with white lettering.
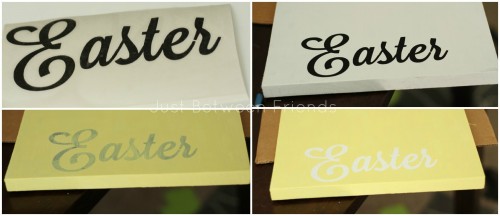
I gave my board a quick sanding around the edges and a little on the lettering to give it a more worn look and then moved on to the egg.
To make the egg, I used my silhouette again and cut out an egg shape that is 12′” tall and 8.5″ wide. Then I used that as a stencil on my foam board. After you have it traced, use an Xacto knife to cut out the shape. Choose a cute paper to be used for your egg and then embellish.
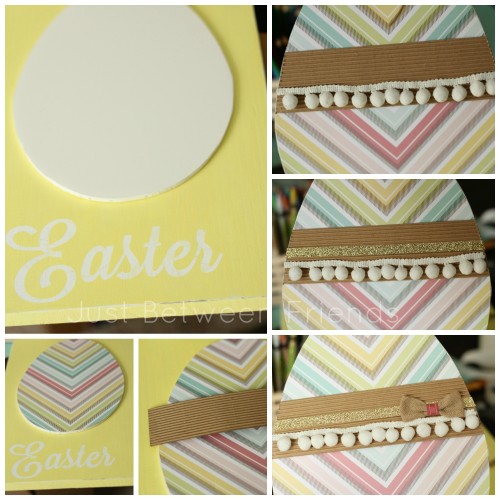
After I had everything attached to my egg, I just hot glued the egg onto my piece of wood. There you have it! A really cute and inexpensive DIY Easter Egg Decoration!

Love all the colors and textures here–Happy Easter 🙂
Steph-Thanks so much!
How cute, Jonie! I love the whole set-up — the background, the garland, the wine glass upside down (!) with the bird. ADORABLE!
Lorene- You are so nice! Thank you for your compliment! I am pretty pleased with the way it turned out as well.